Smitefire logo

Join the leading SMITE community.
Create and share God Guides and Builds.

Create an MFN Account


Or

Not Updated For Current Season

This guide has not yet been updated for the current season. Please keep this in mind while reading. You can see the most recently updated guides on the browse guides page

x

Vote received! Would you like to let the author know their guide helped you and leave them a message?

Banner for Cthulhu guides

Cthulhu R'lyeh wgah'nagl fhtagn (Solo/Support Conquest)

13 3 68,775
8.4
by St.Elsewhere updated June 20, 2020

Smite God: Cthulhu

Build Guide Discussion 12 More Guides
Choose a Build: Solo
Solo Support
Tap Mouse over an item or ability icon for detailed info

Cthulhu Build

Start

Notes Depending on your match up is if you should get Imperial Helmet or Druid Stone .

Notes

Depending on your match up is if you should get Imperial Helmet or Druid Stone .

Build Item Warrior's Blessing Warrior's Blessing
Build Item Imperial Helmet Imperial Helmet
Build Item Druid Stone Druid Stone
Build Item Healing Potion Healing Potion
2
Build Item Mana Potion Mana Potion
2

Core

Build Item Shoes of Focus Shoes of Focus
Build Item Stone of Binding Stone of Binding
Build Item Jade Emperor's Crown Jade Emperor's Crown

Solo

Build Item Tyrannical Plate Helm Tyrannical Plate Helm
Build Item Genji's Guard Genji's Guard
Build Item Ethereal Staff Ethereal Staff
Build Item Pridwen Pridwen

Situational

Build Item Shogun's Kusari Shogun's Kusari
Build Item Spectral Armor Spectral Armor
Build Item Hide of the Nemean Lion Hide of the Nemean Lion
Build Item Genji's Guard Genji's Guard
Build Item Mantle of Discord Mantle of Discord

Relics (Solo)

Build Item Teleport Fragment Teleport Fragment
Build Item Purification Beads Purification Beads
Build Item Aegis Amulet Aegis Amulet

Cthulhu's Skill Order Notes Your 2 is your main wave clear in solo dealing more damage than your 1 later on.

Notes

Your 2 is your main wave clear in solo dealing more damage than your 1 later on.

Sanity Break / Sever

1 X Y
Sanity Break / Sever
4 8 11 12 14

The Mire / Devastate

2 A B
The Mire / Devastate
1 3 6 7 10

Rushing Terror / Transfuse

3 B A
Rushing Terror / Transfuse
2 15 16 18 19

Descend Into Madness

4 Y X
Descend Into Madness
5 9 13 17 20
Sanity Break / Sever
4 8 11 12 14

Sanity Break / Sever

1 X
Sanity Break: Cthulhu sends out a terrifying blast of energy, dealing damage to all enemies hit and reducing their Attack Speed. Enemies hit by this ability also do reduced damage to Cthulhu for 6s.
This ability applies 1 stack of Torment, 2 if the enemy hit is facing Cthulhu or Fears them instead if they are afflicted with Insanity. Successfully consuming Insanity permanently increases the base mitigation of this ability.

Ability Type: Cone, Fear, Damage
Damage: 100 / 150 / 200 / 250 / 300 (+40% of your Magical Power)
Attack Speed Slow: 20 / 22.5 / 25 / 27.5 / 30% for 3s
Fear Duration: 1.5s
Damage Mitigation: 20% + 0.5% (Max 30%)
Cost: 60
Cooldown: 10s

Sever (Ultimate Form): Cthulhu swipes down at the ground beneath him, creating 3 large projectiles. These projectiles damage enemies and apply a stacking Protection Reduction debuff. This ability does not proc item effects.

Ability Type: Line, Debuff, Damage
Damage: 100 / 140 / 180 / 220 / 260 (+25% of your Magical Power)
Protection Reduction: 4% stacking up to 4 times
Debuff Duration: 5s
Cost: 0
Cooldown: 1s
The Mire / Devastate
1 3 6 7 10

The Mire / Devastate

2 A
The Mire: Cthulhu summons a portal creating a slowing field of eldritch mire at the target location. The Mire continues to grow as the portal fires out two masses of corruption that hit and damage all enemies in the field. The first shot also Slows enemies while the second Roots them, both hits applying 1 stack of Torment.

Ability Type: Circle, Crowd Control, Damage
Damage per shot: 60 / 105 / 150 / 195 / 240 (+30% of your Magical Power)
Slow: 10%
Corruption Slow: 35%
Corruption Slow/Root Duration: 1s
Mire Duration: 3s after ability end
Cost: 50 / 55 / 60 / 65 / 70
Cooldown: 14s

Devastate (Ultimate Form): Cthulhu fires a devastating blast of psychic energy that damages and knocks up enemies.

Ability Type: Circle, Knockup, Damage
Damage: 140 / 175 / 210 / 245 / 280 (+20% of your Magical Power)
Cost: 60 / 65 / 70 / 75 / 80
Cooldown: 5s
Rushing Terror / Transfuse
2 15 16 18 19

Rushing Terror / Transfuse

3 B
Rushing Terror: Cthulhu creates two twisting projectiles at his sides as he unfurls his wings and charges forwards, damaging, stunning and knocking away enemies hit. The projectiles follow at a slightly slower pace but travel further, damaging enemies as well. Enemies hit by Cthulhu or the projectiles gain 1 stack of Torment.

Ability Type: Dash, Knockback, Damage
Damage: 70 / 110 / 150 / 190 / 230 (+30% of your Magical Power)
Stun Duration: 0.4s
Projectile Damage: 40 / 70 / 100 / 130 / 160 (+20% of your Magical Power)
Cost: 60 / 65 / 70 / 75 / 80
Cooldown: 16s

Transfuse (Ultimate Form): Cthulhu transfuses his own life force into the area around him giving Allies Health, Movement Speed and Power. Enemies are also hit, taking more damage the closer they are to Cthulhu. This ability damages Cthulhu for 4% of his Maximum Health. If Cthulhu is below 20% Health, this ability does not damage Cthulhu but all Ally effects are reduced by 50%.

Ability Type: Circle, Heal, Damage
Damage: 120 / 140 / 160 / 180 / 200 (+20% of your Magical Power)
Ally Healing: 5 / 6 / 7 / 8 / 9% Max Health
Power: 20 / 25 / 30 / 35 / 40
Movement Speed: 20%
Duration: 3s
Cost: 70
Cooldown: 6s
Descend Into Madness
5 9 13 17 20

Descend Into Madness

4 Y
Cthulhu reveals his true form as he plunges the battlefield into R’lyeh while any enemies caught nearby are damaged.

In this form Cthulhu gains increased Health, becomes immune to Crowd Control and gains access to new abilities. Enemies near Cthulhu gain stacks of Torment, increasing in pace if they are facing him. Enemies also suffer the debuff effects of Sanity Break, causing them to deal less damage to Cthulhu.

Ability Type: Circle, Buff, Damage
Damage: 160 / 205 / 250 / 295 / 340 (+50% of your Magical Power)
Max Health: 25%
Duration: 10 / 11 / 12 / 13 / 14s
Debuff Radius: 50
Cost: 100
Cooldown: 120s

*NOTE* Cthulhu cannot use relics while in his ultimate form.

Introduction

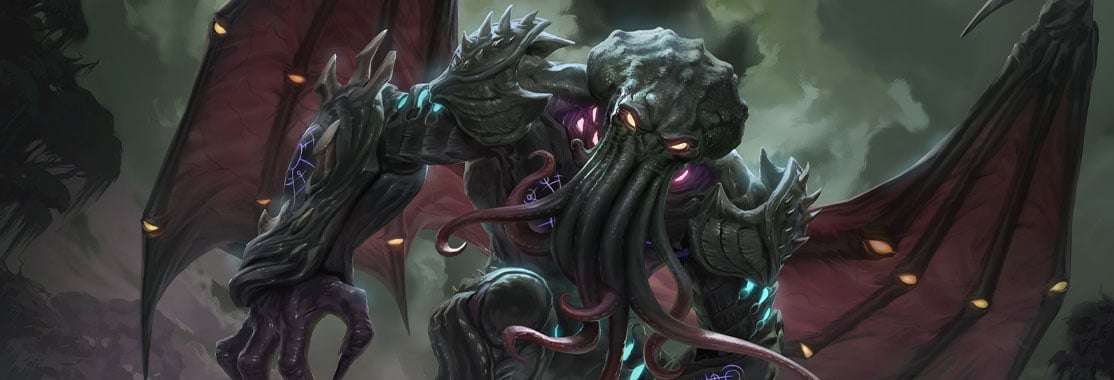
Hello and welcome to my first guide. During the launch to Cthulhu, Smite posted on their twitter normal tweets with Zalgo text. At first I didn't think anything about it but then, the cinematic was released and I was excited. This would not be Hi-Rez's first god introduced based on text alone, but is one of my favorites. Nyarlahotep, Yog-Sothoth, or even Azathoth are still potential Lovecraftian horrors to join the Elder Gods pantheon in the future. When I first saw Cthulhu's abilities I knew he was an Insanely strong god, and the PTS nerfs proved that.

Skills

Passive - Prey on Fear

Prey On Fear is Cthulhu's passive. With every 3 hit of your auto attack or ability his you drive your foe mad. Every 4th stack causes your foe to go insane and you gain 25 magical power. The main way of applying stacks is 2, 3, 1.
1 - Sanity Break / Sever
Sanity Break / Sever's first half of the ability deals damage in a cone in front of Cthulhu and slows attack speed. It applies one stack of Prey On Fear or two if they are facing Cthulhu. Not as strong of a wave clear as The Mire / Devastate. It grants damage mitigation against enemies that are hit by it. If the 4th stack of Prey On Fear is caused by Sanity Break / Sever they are fear for a short duration and you gain a permanent .5% additional mitigations. You would have to land up to 20 fears in order to max the mitigations.
The second half of this applies protection reductions and replaces your auto attack when Descend Into Madness is active.
2 - The Mire / Devastate
The Mire / Devastate is the main source of wave clear. It is a 3 second channel that can be interrupted but also can be channeled while moving. Each hit applies Prey On Fear. The first instance of damage is the second circle in the ground target. The first second is just a slow. Seconds 2 and 3 deal damage and slow even more. The 3rd second is a root. Ideally, you drop The Mire / Devastate for 2 stacks of your passive, followed up by Rushing Terror / Transfuse not to stun but to hit them with the projectile for the 3rd stack of the passive. Finishing up with Sanity Break / Sever to fear and apply that 4th stack of Prey On Fear.
The second half is a good sized aoe that knocks up and damages enemies. There is a windup to the ability. The projectile lands after the ground target changes to grey. It is a great ability to catch up to enemies fleeing or to line up your 1.
3 - Rushing Terror / Transfuse
Rushing Terror / Transfuse is your main escape or catch up. Anyone directly hit by Cthulhu takes damage, is knocked up and stunned for .4 seconds. Two projectiles are launched at a slower pace than Cthulhu and deal a bit less damage but apply a stack of Prey On Fear.
Where this ability shines is during Descend Into Madness. At the cost of 6% health, you deal damage all around you, percentage heal your allies, grant them power and movement speed.. This makes Lotus Crown an excellent pick up as a support to grant protection as well. Enemies closer to you take more damage than those on the edge of this ability centered on you.
4 - Descend into Madness
Descend Into Madness makes you massive. There is a slight windup but enemies around you take damage as change the game's sky box to reflect Ny'alotha R'lyeh. Your abilities change as described prior. Your health increases by 30%. Enemies close to you slowly go insane, but faster if they are facing you. They also deal less damage to you based on the mitigation you've acquired from Sanity Break / Sever. Your ult is your an insane buff to say the least. You can cancel your ult at any time during the duration. Pridwen will grant you a shield after your ult has finished allowing you to either chase with your Rushing Terror / Transfuse or flee as your allies finish off everyone else.

Ph'nglui mglw'nafh Cthulhu R'lyeh wgah-nagl fhtagn.

Leave a Comment

You need to log in before commenting.

Collapse All Comments

1
silentshell (5) | June 17, 2020 6:32am
Just a lowly arena main, but from what little I have played him there..with the way his damage scales on all of his abilities I have a more staggered progression myself on his skills that seems to work pretty well. I don't know how it would work in Conquest, but i have been going 1,2,3,1,4,1,1,2,4,1,2,3,4,2,3,2,4,3,3,4.

About his 2, he has only been playable for 1 day so i feel like even though it is hard to hit with the 2 it is more because players are using it differently than it is intended for. The more and more i play him it seems like really you shouldn't be popping the 2 unless members of each team are right in the middle of a team fight. They are focused on your team and you pop it in the middle of the fight. Don't get me wrong, trying to hit isolated members if you can hit it can be good and it can be a good buffer tactic to create space but i think that the 2 will really shine when players start timing it more as mostly support during team fights.

In terms of Conquest I feel like his 2 would also be his main lane clear on minions. I feel like you would probably want to have your 1 off of cooldown readied for enemy players since the 2 can be difficult to land in 1v1 opportunities looking at it from an early match standpoint. If you are using the 2 for your waveclear(which there are enough minions in arena for me to have gauged how effective it can be vs them) you have your 1 free for players.
1
Branmuffin17 (394) | June 17, 2020 11:09am
This is the difficulty in deciding which ability to prioritize. The 1 is short range but easy to confirm. The 2 is somewhat more difficult to confirm, but has way better damage potential and can easily apply to the whole wave without manipulation. But really, it depends on mode and how you're able to play.

Reasons for prioritizing the 1:

If you can somewhat safely initiate with the 3 and immediately apply the 1, then the 1 is the better direction. It also has an increasing AS slow per level.

In ult form, you'll get harder hits on the 1 (basic).

Reasons for prioritizing the 2:

Higher total damage potential. Decreasing CD per level.

In Arena, I'd probably just prioritize the 1. Once maxed, I'd situationally level the 2 or the 3...not sure which one, but probably the 2 due to the decreasing CD, but if I can initiate a lot with the 3, I'd probably prioritize that and just use the 2 for zoning/lockdown.

In Conquest, I would probably go (aggressive) 1-2-3-1-4 or (more passive) 2-3-1-2-4. I wouldn't max the 2 first though...I would get it to level 3 maybe, then finish off the 1.

One thing to keep in mind with the use of the 2, again, it's a good zoning tool based on the size. And when you consider narrower lanes in Conq, you can more easily connect with it. It's even better in the Jungle unless the enemy uses an escape.
1
silentshell (5) | June 17, 2020 11:13am
Branmuffin17 wrote:
This is the difficulty in deciding which ability to prioritize. The 1 is short range but easy to confirm. The 2 is somewhat more difficult to confirm, but has way better damage potential and can easily apply to the whole wave without manipulation. But really, it depends on mode and how you're able to play.

Reasons for prioritizing the 1:

If you can somewhat safely initiate with the 3 and immediately apply the 1, then the 1 is the better direction. It also has an increasing AS slow per level.

In ult form, you'll get harder hits on the 1 (basic).

Reasons for prioritizing the 2:

Higher total damage potential. Decreasing CD per level.

In Arena, I'd probably just prioritize the 1. Once maxed, I'd situationally level the 2 or the 3...not sure which one, but probably the 2 due to the decreasing CD, but if I can initiate a lot with the 3, I'd probably prioritize that and just use the 2 for zoning/lockdown.

In Conquest, I would probably go (aggressive) 1-2-3-1-4 or (more passive) 2-3-1-2-4. I wouldn't max the 2 first though...I would get it to level 3 maybe, then finish off the 1.

One thing to keep in mind with the use of the 2, again, it's a good zoning tool based on the size. And when you consider narrower lanes in Conq, you can more easily connect with it. It's even better in the Jungle unless the enemy uses an escape.


All sound like valid points though i still seem to like staggering out all of his abilities as equally as possible because it doesn't really look or seem to me that any one of his abilities scale immensely better than the others, like can be the case with the kits of some of the other gods. I feel like i have a more balanced attack bringing them all along sort of linearly.
Load more comments (3 more replies) →
1
exterminate68 | June 17, 2020 3:26am
1. What the heck is with the double blessing? Fix this
2. Cthulhu's 1 should be prioritised 1st since is's easier to hit than the 2, even if it deals less damage

edit: Ok, now I see why there are 2 blessings, but you should separate both these starters for supp and solo
1
Gulfwulf (81) | June 17, 2020 7:33am
I was about to say that the author combined the two builds into one, but you don't necessarily build the same in both roles; I would skip Stone of Binding in solo and go straight into a counter-item instead. I would also get Gauntlet of Thebes after binding in support and drop Tyrannical Plate Helm from both builds completely.
1
silentshell (5) | June 17, 2020 8:06am
Gulfwulf wrote:
I was about to say that the author combined the two builds into one, but you don't necessarily build the same in both roles; I would skip Stone of Binding in solo and go straight into a counter-item instead. I would also get Gauntlet of Thebes after binding in support and drop Tyrannical Plate Helm from both builds completely.


Thebes since it would give the protect/aura and also, in the case of the SoB build give some extra health to make up for the lack of it early right?
Load more comments (2 more replies) →
1
Devampi (105) | June 17, 2020 3:47am
Normally teh first ability you lvl is fro waveclear purposes. Therefore, I think he is lvling the 2 first.
Loading Comments...
Load More Comments
League of Legends Build Guide Author St.Elsewhere
Cthulhu R'lyeh wgah'nagl fhtagn (Solo/Support Conquest)
Table of Contents

SMITEFire is the place to find the perfect build guide to take your game to the next level. Learn how to play a new god, or fine tune your favorite SMITE gods’s build and strategy.

Copyright © 2019 SMITEFire | All Rights Reserved